
Hi everyone, Mollie here. I’m happy to be back with a new project for anyone who is lucky enough to own a 16 inch by 20 inch Gelli Arts® plate (If you don’t have one, just use the largest gel plate you have). It’s an investment, but the possibilities are endless. It’s so fabulous to have such a large space to work with, but I do find it makes me be cautious as I don’t want to waste such large sheets of paper if I get it wrong!

However, this wrapping paper project is perfect because you use Kraft paper, and it’s incredibly cheap!

The 2nd tool for this project, which I would highly recommend, is the Gelli Arts® Perfect Placement tool®. I adore mine – it has been a game changer for me. It’s possible to do this project without, but it certainly makes registering your prints much easier.

The first thing to do is to measure out your paper by unrolling it next to the gel plate and then fold it where you want to cut the paper. A Kraft knife or scalpel is easier and neater than scissors. I measure out lots of sheets in one go and then put them under a rug to flatten them a little.
Next select your colours. I chose to go for a contrast and my first layer was a mixture of yellows, pinks and red. I chose metallic purple and pink for the 2nd layer. As it’s such a large plate and needs more paint than usual, I opted for a cheaper paint – Pebeo acrylics, and then mixed in some Liquitex Slow-Dri medium to make it slow drying.
Add paint to the plate spacing it out evenly. Either direct from the tube or bottle, or if you go for the cheaper option like me, you will need a palette knife to add the paint – have it all mixed up in advance.

Roll out your paint. I tried out some different effects. Random mix of colours, stripes of colour and Ombre, where the colours were blended at the edges. The joy of the cheap Kraft paper is that you can experiment to your heart’s desire. I print onto the shiny side of the paper for that ‘gift-wrap’ look.


If you are using the Gelli Arts® Perfect Placement tool®, then carefully position it at the top left of your gel plate. It’s hard positioning such a large piece of paper to take your time and make sure the left hand side is perfectly in place before smoothing your paper down. You may need more than one go to get this right. If you don’t have one then I recommend marking with a pencil where the top 2 corners are, on the back of the paper.


Give your paper a good rub and remove it and leave to dry.
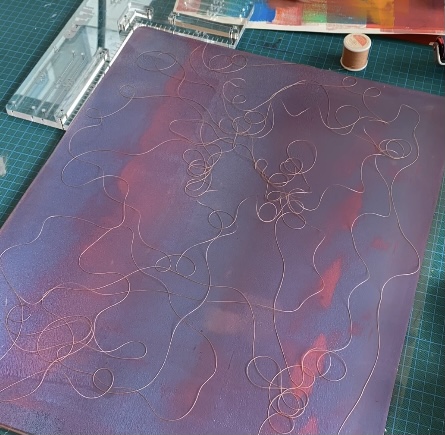
The second stage is where the fun really starts. To create my pattern, I collected together a reel of cotton thread and some other yarns and cords I happened to have in my sewing box. You could use literally any type of thread, yarn etc. Be wary of gardening string which may shed bits onto the paint.
Once your paper is dry again add your second colour/s to the gel plate in the same way as the first. Arrange whatever you are using over your plate. You can do this as randomly as you like, or carefully create a design as you position the thread. You get an interesting effect by allowing it to overlap itself. Be prepared to try this out a few times to find out what works and you will find your ideas develop this way.
Now either position your Gelli Arts® Perfect Placement® tool back in place, or follow the marks on the back of your paper to get the sheet of paper back in exactly the same position as before. As well as rubbing the back of the paper with the palm of your hand or a baron; feel for the thread and make sure you smooth between with your fingertips to get defined lines. Peel your paper back a little and check and then continue rubbing if necessary.

Carefully peel back the paper to revealed your finished gift wrap. I find that metallic colours work really well for the 2nd layer of paint and give the wrapping paper a really classy and expensive look. Trim the edges with a scalpel or Kraft knife.

Who wouldn’t want a present wrapped in hand printed paper with a matching tag!
To make your tag, use the same paints and probably a smaller gel plate. Follow the same technique on a smaller scale, or use different colours for a contrasting tag. If you are using luggage labels, don’t forget to remove the string before printing. Be careful to keep the reverse clean by putting a sheet of clean paper over the tag before pulling the print.
As ever, I would love to see your gift wrap if you decide to make some. Please tag me on Instagram or Facebook at @artwithmollie. Check out the video on my YouTube channel – follow the link in the blog and comment and let me know how you got on!
MATERIALS:
16 by 20 inch Gelli Arts® gel plate or the largest size you have
Gelli Arts® Perfect Placement® tool (optional)
A roll of Kraft paper
Selection of slow drying acrylic paints or regular paints and a Slow-Dri medium
Brayer
A selection of thread, cord, thin ribbon and string
FIND US:
FOLLOW US:
The video was fantastic to watch. Love the different layers of colour and texture! Such an informative blog post Mollie.
What truly beautiful wrapping paper, & yes, I’d very much like to receive a gift wrapped in this. I only have a 5×7 gelli plate, but I could make some tags & cards with the string. It’s stunning.
Great technique. Thanks.