
Hi everyone, Mollie here, excited to be back with my second blog. Once again, my inspiration has come from an item destined for the recycling bin. After a supermarket chocolate trifle (my son’s favourite!) I decided that the plastic bowl was too good to throw away. As I love papier-mâché, I have used this process to make a decorative bowl using my 5 by 7 inch GelliArts plate and GelliArts parchment paper (cut into smaller pieces). I am really pleased with the finished result, which as with any papier-mâché project, has been a labour of love.
Follow the instructions below and you can also watch a video of me making the bowl by following the link to my YouTube channel. You could also use a ceramic bowl or even a plate.
If you make a bowl then please tag me on Instagram @artwithmollie, as I would love to see your creations!
Smear Vaseline over the inside of your bowl. Be generous as this is how you will allow you to remove the papier-mâché bowl when it is finished

Add a little water to your glue to make is slightly looser and easier to apply. Not too runny though

Cut your newspaper into strips and squares/rectangles. Judge the size and shape by the size of the bowl you are covering.
For the first layer, paint glue onto the strip before sticking it to the inside of the bowl. Work your way around the inside. The smaller the pieces of newspaper, the smoother the finished result. It all depends on your patience. Carefully follow the contours of the bowl and press the paper into any gaps and smooth out any wrinkles.

Cover the newspaper with a thin layer of glue as you go. You will need a damp cloth to hand, and to regularly wipe your finger tips to keep them glue-free.
Add multiple layers. I find papier-mâché to be a very mindful activity. You will need to leave time for the glue to dry between each layer, but the beauty of using PVA glue rather than the more traditional methods, is that it dries a lot quicker. I made my bowl over a number of days.
I would suggest 5 to 6 layers. When you think it may be finished, ease it out of the plastic or ceramic bowl and check. You can always put it back in and add another layer if necessary.

Now papier-mâché the outside of the bowl to cover the slippery Vaseline and finish with a layer of glue. Leave to dry.

Trim the rim of the bowl with sharp scissors to remove any bumpy edges and finish by gluing thin strips of newspaper (about 2 cm/1 inch long) over the edge so that one end is stuck inside and the other on the outside of the bowl. This will leave your rim smooth and strong. Paint over with a thin layer of glue.


When the glue is dry, paint on a layer of white acrylic paint. This does not need to be slow-drying, like the paint you use for printing. In fact, if you use standard acrylic paint it will be dry very quickly, just be sure to wash your brush straight away as dried acrylic ruins a paintbrush.

Now it’s time to print the paper that you will use to decorate your bowl.
I used Gelli Arts parchment paper as it is translucent. I cut it into quarters making it the perfect size for a 5 by 7 inch Gelli Arts plate. I also used my new Gelli Arts Placement Tool which I found made the whole process much easier. I wouldn’t be without it now!
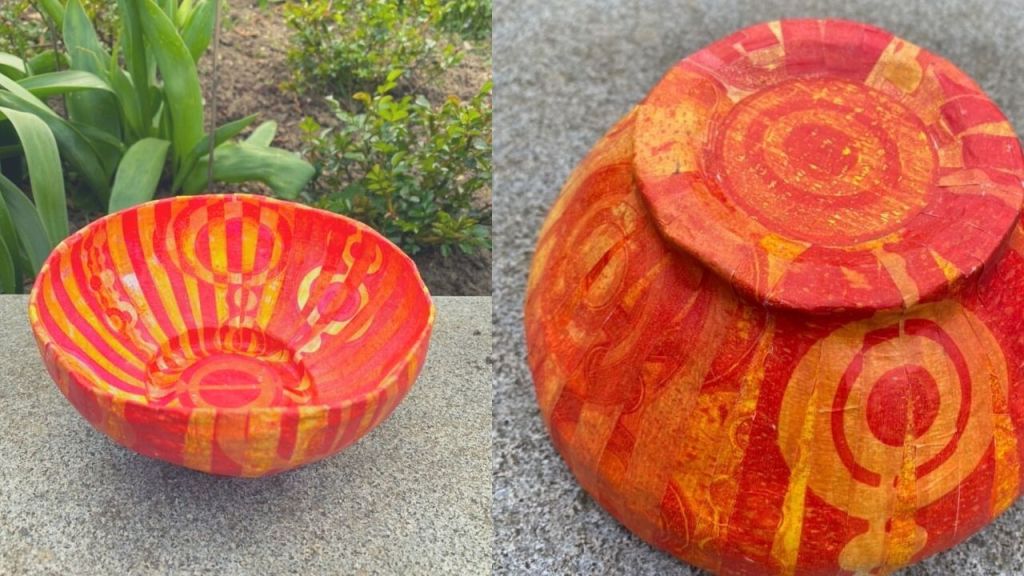
I started by creating multiple background sheets, using a combination of yellow, orange and pink. I created an ombre effect by putting small dots of 3 different colours along the plate and then rolling it out so the colours overlapped in between. I then printed this onto 8 sheets of parchment paper. The number of sheets you will need will depend on the size of your Gelli plate and bowl.

Next I added a little red paint, or combination of red and pink to the plate.

I then selected my Gelli Arts ‘Bead’ stencils that I thought would create a good effect around the side of the bowl. I used the same stencil each time. I took one print whilst the stencil was on the plate, being careful to smooth around the circles cut out of the stencil, to get clean lines. I then took a second print of the paint left behind, when this print was finished and the stencil was removed, and printed this onto a different background.
All my prints were 2 layers. The yellow/orange background ombre layer, and the red/pink stencil layer. This left me with a selection of prints which co-ordinated but were all different.
When the prints were dry I trimmed the edges off, leaving me with a neat rectangular print.

I put my prints in pairs and cut each print into 1 cm strips. I kept each print together so that I could use the strips in the correct order (like a completed puzzle)

I would recommend alternating the 2 prints one at a time, to create an interesting effect. This is what I ended up doing via a trial and error process. Otherwise you have to guess how much space to leave in between each strip. Make sure that you fold the end of the strip over the rim by about 1-2 cm/0.5 inch.

Work your way around the outside until you have covered it all. Don’t forget the damp cloth and to wipe your fingers clean regularly.


Now work your way round the inside of the bowl. Start gluing each strip from the top of the bowl so that the edge is very neat and you do not leave any white showing.

Finally, use a compass to measure the circle at the base of your bowl, inside and out. Cut out 2 circles – this is where using the Gelli Arts ‘Bead’ stencil made perfect sense, as I had some lovely concentric circle patterns which were perfect for this finishing touch.

And the very last thing to do when everything is dry, is to paint over a thin layer of glue or use a varnish to protect the bowl.


I really hope you enjoy this project, and create something that you love. Please don’t forget to tag me in your Instagram posts as I would love to see what you make.
If you have any questions, please leave a comment here, a comment on the YouTube video, or contact me on Instagram.
MATERIALS
Gelli Arts® Gel Printing Plate – size depends on the size of your bowl
Gelli Arts® Perfect Placement Tool (optional, but very useful!)
Plastic bowl
PVA glue
White standard acrylic paint
Newspaper cut into strips and squares of different sizes
Vaseline
Paint brush
Scissors
Damp cloth
Brayer
Acrylic paint – slow drying translucent colours (I used Golden Open)
Scalpel
Ruler
FIND US:
FOLLOW US: