

Here’s a great way to make a sweet valentine to hang in the window using your gel pad, tissue paper, wire and beeswax. You can make several for an installation piece, or give them away to friends and family one at a time.
Please post anything you make on Instagram and tag me at @juliejulieart!
Watch this quick time-lapse of the whole project below, and on my @juliejulieart Youtube channel and then read through the instructions below.
Link to the How to make Tissue Paper Hearts video
Okie dokie, here we go!
INSTRUCTIONS:
- You can use one Gelli Plate at a time for this project. If you’re using more than one Gelli Plate, remove the plastic sheets from both sides of the Gelliplates and tape down the bottom plastic sheets to the table. Then put the gel pads on top, so they are right next to each other.


2. Gather tissue paper, paint, and anything you like to use for mark making. I cut stencils out of canvas, and use ribbon and string.

3. Roll out paint and lay down mark making objects. I’ve used red and purple paint for this project.

4. Take up the first layer of paint on tissue paper (or regular paper if you like) knowing that it’s not necessarily going to be used for your final hearts and circles. You might like it, or you may want to save it for another project. The magic usually happens with the second pull.

5. Remove all the things! You’ll need to work rather quickly so the paint doesn’t dry, because tissue paper is more fragile than regular copy paper. If the paper sticks, clean off your gelli pad and add a small amount of gloss gel medium (photo 5B) to the surface, roll it out, and then add paint.


6. Place the tissue paper on top of the gelli pad and press it in gently with the palm of your hands. Remember to work quickly! Then grab one end of the paper and carefully pull it up.

7. Repeat steps 3-6 adding more layers of color, as you like. Let the paper dry a bit before you pull another layer of color. I like to work on several pieces of paper at a time so they have time to dry between colors.

8. Pull out a desired length of wire to make circles and hearts. Create a small twist/loop at the top of the wire or heart to use for threading wire or ribbon through to hang later.


9. Glue circles onto the paper. Remember to flip the “good side” of the paper over, and glue the wire shapes onto the backside of the paper.

10. After the glue dries, cut out the shapes, leaving about ¼” of space around the wires. Once the paper is dipped in the wax, you’ll roll that extra paper back over the wire to help secure it.

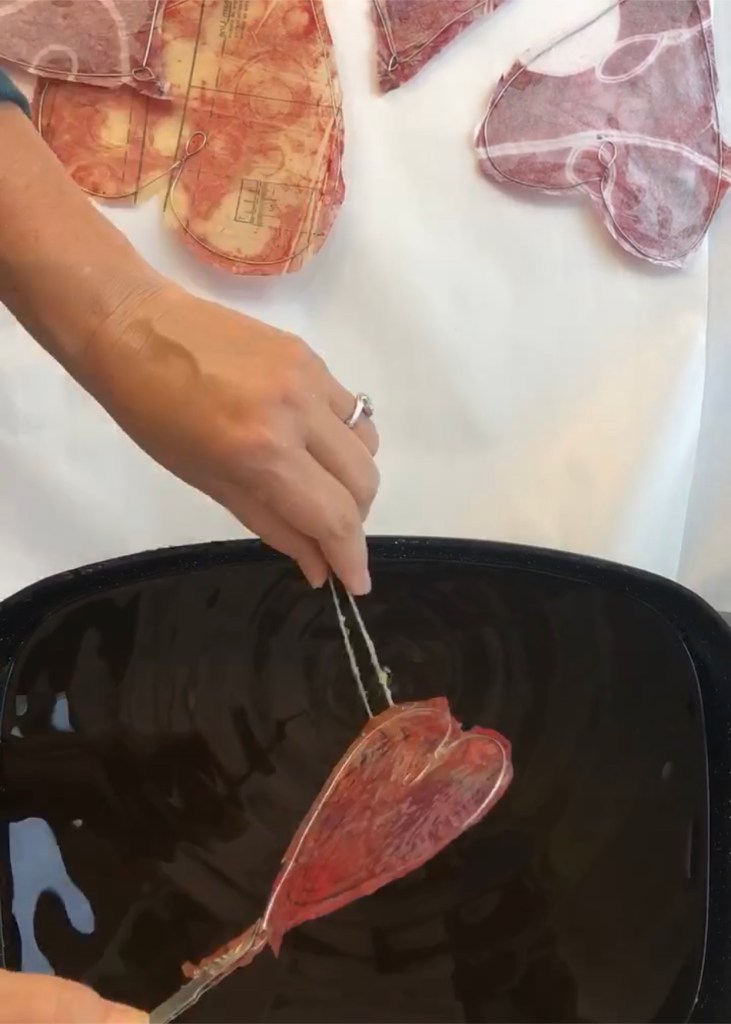
11. Melt wax in an electric frying pan, in a safe place, away from all the paper. Please be careful, and keep hot wax away from children and pets. Also, if you’re doing this outside on a sunny day, the bees will find you, and they will not be happy! A 1lb block melted makes it easier to dip the wire circles, and will be enough for about 50 circles.

12. Once wax is melted completely, lay out your wax paper or butcher paper on the table next to the pan, and use tweezers or metal tongs to dip the circles into the hot wax. I use two sets of tweezers, one for each hand. Let the excess wax drip off a bit before you lay the heart (or circle), backside down, back onto the landing paper.

13. Wait 30 seconds or so until the wax is cool enough to handle, then pick up the heart and gently roll the extra edge of the paper back onto the back side of the shape. Flip it over and it should all be smooth!
14. Time to hang the shapes in the window! Carefully poke a wire through the loop of the shape. and thread thin wire or ribbon, yarn, etc. through for hanging.
Some of the shapes can be hung on wire (14A, 14B), and attached to the suction cup, and some can be attached to the hook of the suction cup directly (14C)


15. Arrange the shapes onto the window however you like. If you’re using several circles, you may want to hide some of the suction cups behind some shapes for a cleaner look.


Viola! You just made some “installation art!” I hope you enjoy it as much as I do.
Thanks for reading, and I’m looking forward to seeing how it goes. Please post anything you make on Instagram and tag me at @juliejulieart, I’d love to connect and see what you make! And feel free to visit my juliejulie.co website to sign up for my newsletter and workshops (coming soon!) I also have a juliejulieart page on Facebook, and more how-to videos on my juliejulieart channel on YouTube

- MATERIALS:
- Gelli Arts Gel Printing Plate, 1 or several
- Acrylic Paint
- Brayer
- Mark making supplies (string, stencils, stamps, etc.)
- Tissue paper (I’ve used old sewing patterns, but regular tissue paper works great too.)
- Wire, 18 gauge, for making hearts and circles, available by the roll at hardware stores.
- White glue, thinned down with water, or wallpaper paste.
- Paint brush or foam paint applicator
- Thin wire (25 gauge) or string, yarn, ribbon for hanging
- Beeswax
- Electric frying pan for melting the beeswax.
- Long tweezers or small metal tongs
- Wax paper or butcher paper with a waxy side
- Suction cups for attaching to a window, or push-pins for walls or door/window frames.
FIND US:
FOLLOW US:
This is just amazing! Thank you for your directions and tips!
Thank you for sharing.
I don’t have a pan like that or the wax. I wonder if ironing the tissue between layers of wax paper would do something similar?
The translucent quality of these is so beautiful! I’ve used layered gel prints on tissue paper before but adding them to wire with wax? Love the encaustic look! So going to try this…