OBJECTIVE
- Students Will Be Able To (SWBAT) assemble Halloween themed bookmarks
- SWBAT master collage in a bookmark style project
- SWBAT comprehend the use of typography with selecting and apply text through stickers or handwritten text
SUPPLIES
- 8×10″ Jane Davenport x Gelli Arts® Plate
- Foam lunch box (recycled)
- Cutter
- Pencil
- Black acrylic paint
- Brayer
- White cardstock to print
- A contrasting color cardstock
- Dina Wakley scribble sticks
- Posca markers
- Liquid pearls
- Crop-a-dile
- Black eyelet
- Sari Ribbon
- Tim holtz stickers (Occasions)
- Studio Light washi tape with words
- Halloween wood embellishment
- Glue gun
STEP BY STEP PROCESS
Step 1: Cut the foam lunch box until you have a plain surface without edges.

Step 2: Use a pencil to draw your design in the foam lunch box.


Step 3: Load black paint on half of your Jane Davenport x Gelli Arts® plate.
Step 4: Stamp your foam plate design on the painted side of the gel plate, then stamp it on the blank side of the plate.
Step 5: Pull your print with white paper. Make 2 or 3 prints to find your favorite prints.
Step 6: Cut your favorite prints to the size of a bookmark.
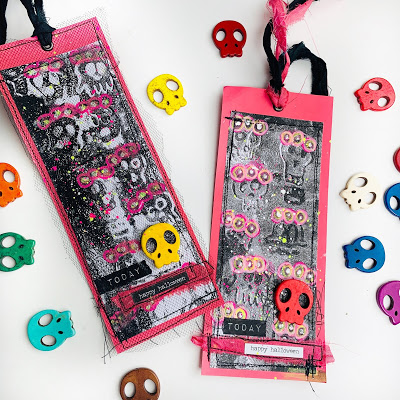
7. Draw three circles on top of each skull with different colors. I use Dina Wakley scribble sticks and Posca markers to make a floral diadem.
Step 8: Add a pearl shape in each flower with Perfect Pearls.
Step 9: Cut cardstock in a contrasting color that is a little bit bigger than your bookmark.
Step 10: Make a hole in the top part of the bookmark with the crop-a-dile.
Step 11: Add some sentiments to your work with Tim holtz stickers (Occasions) and Studio Light washi tape. I add some sari ribbon to make the words pop.
Step 12: Stitch around the bookmark with stitching machine.
Step 13: Now you need to decide if you want to add black tulle or not! If you add it, you need to stitch around the bookmark again.
Step 14: Next, make another hole on the top of the bookmark and add an eyelet. Then knot a sari ribbon on top.
Step 15: Glue a Halloween wood embellishment on top of it with glue gun.
Step 16: Make some splatter with paint markers!
