Hello! Giovanna here
with my first post as a Gelli Arts® artist. Did you know that Gelli Arts® can help you be fashionable? Do you want to protect your clothes while creating, at
home or during a workshop, in style?
This is a super easy project to make — and
the result is stunning!
There is a
huge surprise for you at the end of this post!

Start with two pieces
of white cotton 42 x 32 cm (16.5 x 12.6”) size. I used an old sheet.

Put some drops of
acrylic paint on the Gelli Arts® 4’’ Round plate and spread the paint evenly
with a brayer.


Lay your favorite
stencil over the plate, cover it with the cotton fabric and press lightly on the fabric with your hands.


Remove the stencil
and use the Gelli® plate as stamp on the fabric, creating a ghost print.


Repeat until the fabric
is filled up with colors and patterns and you are happy with the result.


Take an elastic band
slightly larger than your wrist and put a safety pin on one edge.

Sew the painted fabric
along the short side leaving an opening large enough for the elastic band to go
through.

Slip the elastic cord
inside the opening. Make sure to hold onto the elastic at both ends and sew along the longest side. And….
doneeee!!


So fun and easy to do!


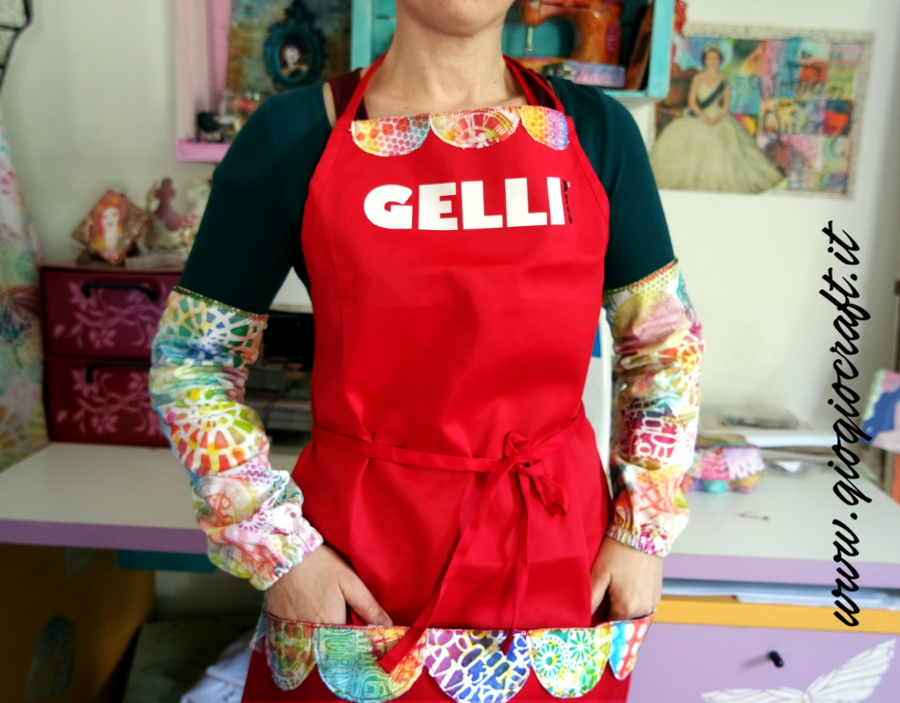
To decorate the apron
use some scraps of white fabric: create some circles and ovals using the mini
oval Gelli Arts® plate with the same technique explained for the protector
sleeves. This time cut out the circles and ovals, and cut them in half.


Pin them to the apron
and sew them using a decorative stitch like a zig zag.

Tip: If you’d like to
wash the protector sleeves and/or the apron add some fabric medium to the
acrylic paints, and iron the painted fabric.
And to celebrate my
first Gelli Arts® blog here’s a GIVEAWAYYY!!!!
Materials:
Gelli Arts® Mini Set – Oval, Rectangle, and Hexagon
Gelli Arts® 4’’ Round
plate
Gelli Arts® Premium
Acrylic Paint Set – Bright Colors
Gelli Arts® Premium
Acrylic Paint Set – Classic Colors
Gelli Arts® 4” roller
Gelli Arts® Apron
White cotton fabric
Stencils
Elastic band
© 2018 by Gelli Arts®, LLC Philadelphia, PA
All rights reserved.
This project is amazing! ����
Fantastico 🙂 un video fantastico e utilissimo per avere anche io questi fantastici manicotti!!!
Wonderful Giò … !!!
Giovanna! These DIY Sleeve Protectors are very nice. Thanks to share video and photos! Love this post.
Gio this is an awesome and very useful idea!!! Definitely need to give it a go…my clothes will thank you!
Great and so useful idea!! Thanks Gio!
Gorgeous colours and a great idea to keep clean during a messy crafting session!
Grazie per questa opportunità! Giovanna sei superlativa!!
Ed ora incrociamo le dita!!! <3
I’ve been thinking about making some sleeve protectors. Now I have a great example to emulate! I love your examples and the results are so pretty 👍
Very nice! Love this project. Now I need to get a plain apron to embelish! Thank you for sharing
Very nice! Love this project. Thanks for the giveaway
Wow un meraviglioso progetto colorato e creativo proprio come piace a me!!!
How awesome to be able to wear your Art Giovanna !! I agree with the title 'fashionable crafter' !!
Love the results
So bright and pretty. Great ideas.
Beautiful project! So pretty I wouldn't want to mess them up! Is there a way to enter the giveaway if you are not on FB? Thanks!
Ahhhhh … this is really a FUN project !
I'm all about DIY's, love this post…
You clever girl, Gio!!! 😀 Such amazing sleeve protectors and apron, so fabulously personalized!! I always admired the sleeves on your blog and finally I know how to make them! Thanks for sharing the tutorial and also for the tip, very useful!!
Hugs!!
Cute, can’t wait to try this!
What a great idea on the sleeves!!!! I am going to make these for my Florida friends for when we paint and play with Geli Prints and inks!!! Thanks so much!
Your first Vedio was spectacular & colorful. This is so cute & useful and doable! Thank you!!! Great gift ideas for our little artist friends too.
Hope to do some fabric printing soon! Inspired by your results.
I loved this project! I never thought to make sleeve protectors, and such stylish ones at that. You did an amazing job on your first Gelli Arts presentation :o)
Your colours are so crispy! beautiful!
Sewing AND Gelli Printing. Best Combo ever! Maybe some shoe protectors too? LOL
Oooo this looks like fun! ��
I love the idea of the sleeve protectors, I will follow this step-by-step !! congrats for your 1st blog spot
The possibilities are endless…
very good !! I like it
Great blog post and video! No more ruined sleeves!! Thank you!
Gill
This is wonderful. Well written and clear. Now I can finally play with my Gelli Plates and not have paint on my forearms. (Don't know how it gets there, but I always have a streak or 3). Looking forward to more of your posts.
Always love a give away!
Great work!
Beautiful project – love my gelli plate !!!
Bellissimo tutorial! Il tuo stile è inconfondibile! Love It!
Great first post. Nicely explained and the pictures are well done. Thanks for the chance to win a great prize package.
I’ve been following Giovanna for a long time – I love her projects and she is the queen of recycling and repurposing!
Excellent project. The sleeve protectors are such a great idea! I think I will make several sets to have on hand. Love the ideas!!
Kathy H
hennies.pennies@yahoo.com
what a great idea, it look awesome