Before I get started… I want to share that the Gelli Arts® Gel Printing Plates just won 2nd place in the “Tool of the Year” category at CreativeWorld in Frankfurt! We are excited, proud and honored. Here are a few pictures from the special occasion.
Now back to our Valentine collage!
Every now and then, I go through my stacks of Gelli™ prints and separate them into four basic
categories: Prints that are finished, prints that need additional printed layers, prints to work back
into, and prints to tear or cut up to use in collage or for making paper cloth. When I’m ready to
start a new project, my source material is relatively organized and ready to inspire!

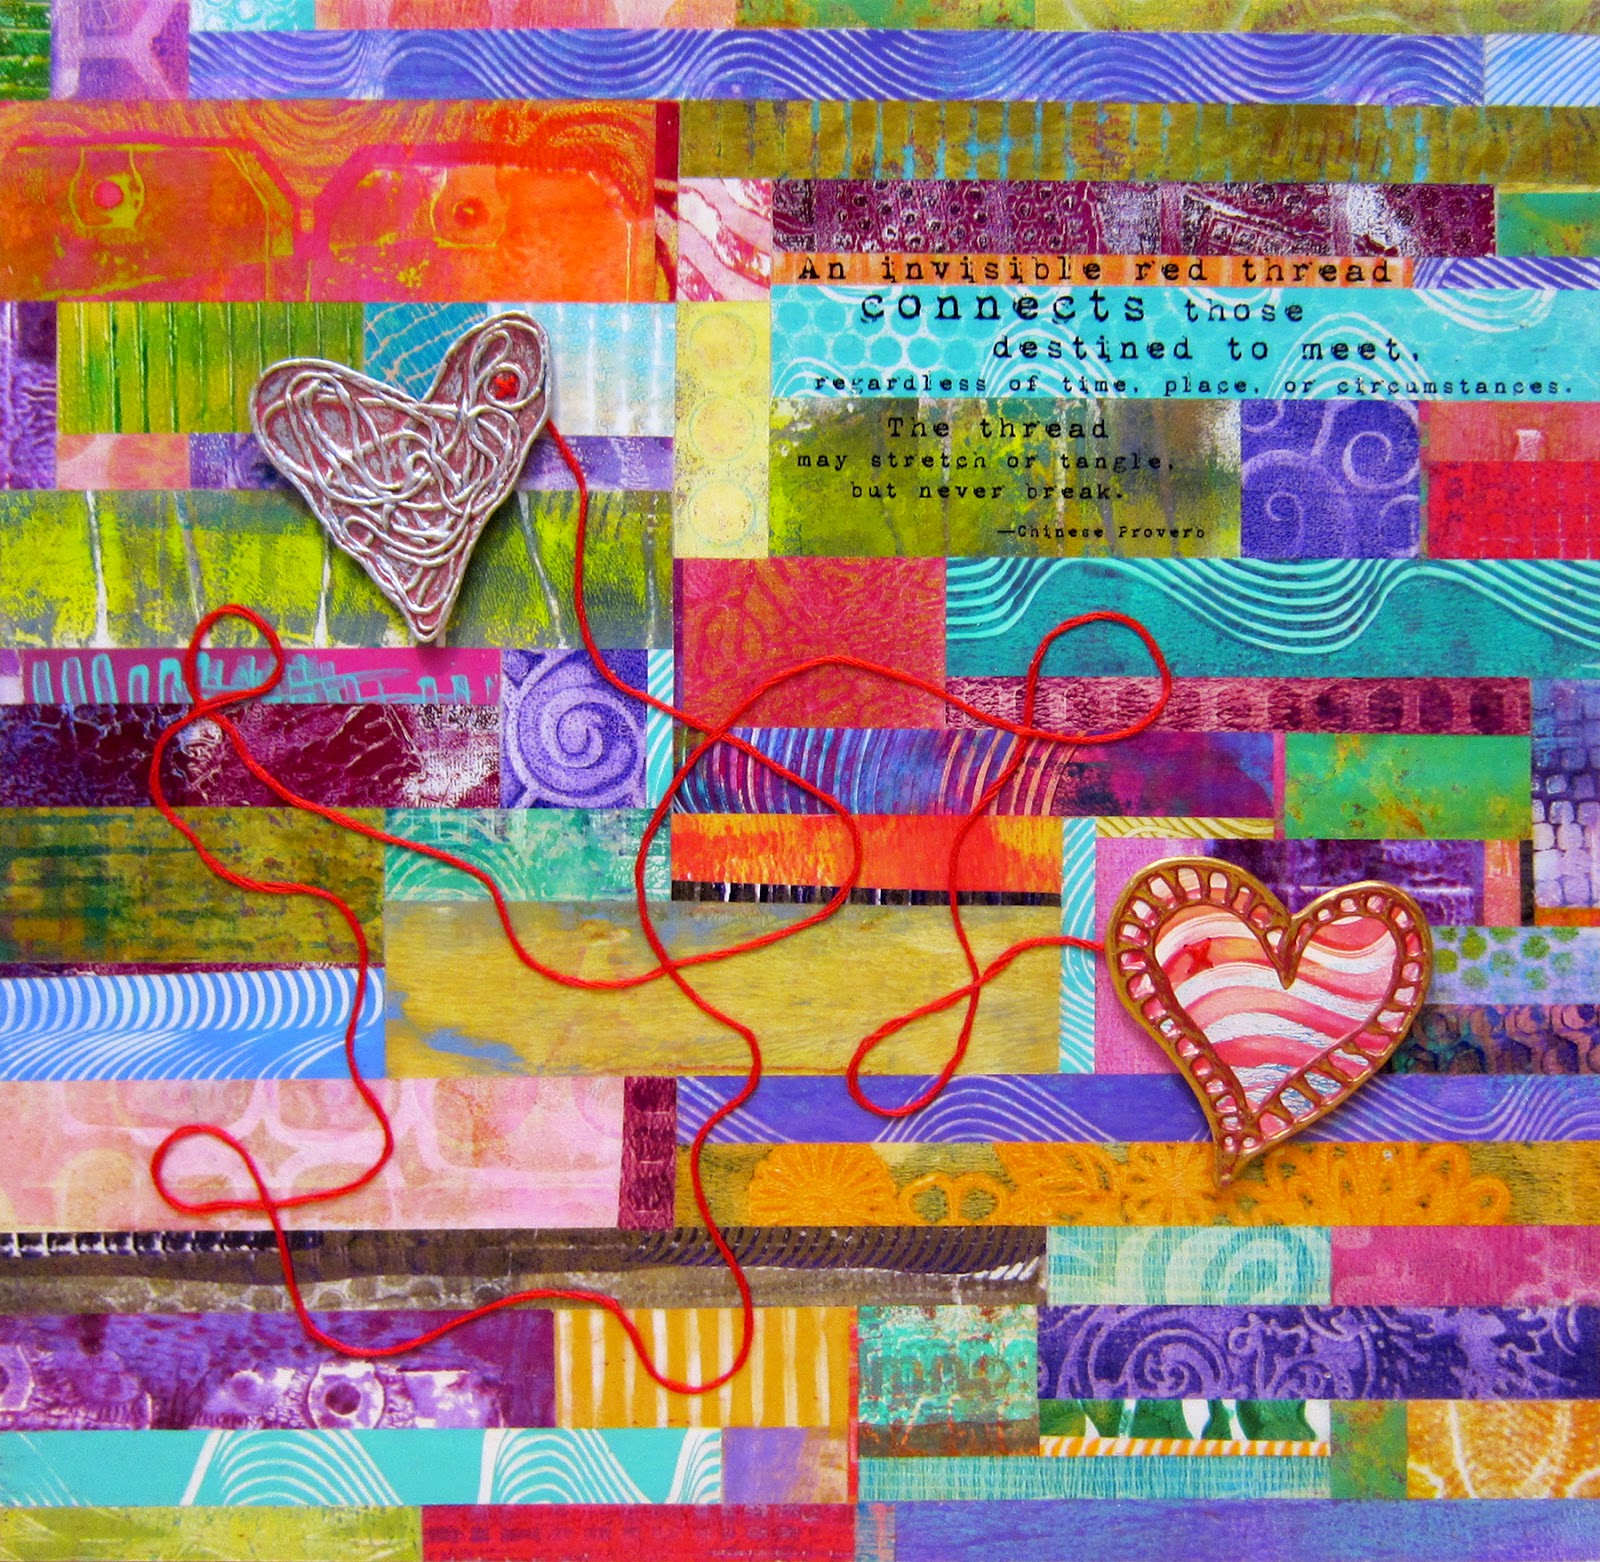
In addition to the colorful array of Gelli-printed papers to work with, my inspiration for this
Valentine collage came from a Chinese proverb with a beautiful sentiment:
An invisible red thread connects those destined to meet, regardless of
time, place, or circumstances. The thread may stretch or tangle, but
never break.
—Chinese Proverb
Here are the steps for making a collage like this:

This project began by sorting through a bin of Gelli prints that were previously cut into pieces.
Some of the pieces are left over scraps from other collage projects and are quite small. Some
are just slivers! For this collage I wanted to create a very flat, smooth surface, so the pieces I
selected were all the same weight—in this case, copy paper—with lots of color!


The base for this collage is a 12×12 Blick Studio Artists’ Board – Gallery Panel. The paper
pieces can be glued directly to the panel with matte medium or your favorite paper adhesive.
But that’s not how I chose to approach this particular collage, so I’ll include the details of my
process.

Instead of glueing the collage together, I arranged the snippets on Steam A Seam 2— a double
stick fusible web. It’s a sticky adhesive layer between backing sheets on each side. To use it,
remove the paper from one side. Arrange your collage papers on the sticky fusible surface.
They’ll stay put temporarily —the pieces can be moved around until you’re ready to fuse them
for a permanent bond. To fuse the pieces, cover with parchment paper and press with a hot iron
following the manufacturer’s instructions.

Remove the remaining backing sheet and fuse the collage to your substrate. Or, you can fuse it
to a medium-weight interfacing first—in case you want to machine sew or hand stitch on the
collage. Not essential, but a good option if you sew on paper.
As it turned out, I fused the collage onto interfacing, but ultimately decided not to sew on it.
Regardless of whether you’ve sewn the collage or not, the next step is to adhere the interfacing
to your final substrate (the Blick panel). You can use matte medium or the adhesive of your
choice. Let it dry completely. Trim any excess collage edges flush against the panel on a cutting
mat with an Xacto knife.

Brush several coats of DecoArt Media Gloss Varnish on the collage to seal the surface, allowing
each coat to dry before adding the next. Paint or collage the sides of the panel.

If you want to add words to the piece in your handwriting—acrylic pens, like Montana PaintMarkers, work well over acrylic paints. Or you can transfer a laser-toner printed version, as I did.
There are many ways to transfer an image. Here’s how this one was done:

- Create a mirror-image and print it with a laser printer. The words must be reversed. Inkjet
prints won’t work for this technique. - Brush several coats of gloss medium onto the print, allowing each coat to dry before adding
the next. I used DecoArt Media Gloss Varnish and it worked great! - If you haven’t varnished the collage, you’ll need to give it a few coats of medium (gloss
seems to work best for this method of image transfer). - Let everything dry. Then place your image face down on the collage where you want it to
transfer. - Iron it in place with a hot iron, bonding the paper to the collage surface.
- Apply water to the back of the paper and let it soak in. Gently rub the paper away to reveal
your transfer! - When all of the paper has been rubbed away, brush a coat of medium over your transfer to
seal it.

The collage has two heart embellishments. They’re fun to create—and add a meaningful
Valentine message!


Here’s how to make a heart like this one:

- Run a fairly long piece of red thread through a small puddle of fabric stiffener. I used 6-
strand embroidery floss and Fabric Stiffener by Crafter’s Pick. - Arrange the thread to create a heart shape on a piece of freezer paper. Let it dry and
harden. Then carefully remove it with a palette knife. - Glue the stiffened heart-shape onto a scrap of Gelli-printed cardstock. Let it dry, then trim
close along the heart edge with scissors. It’s an interesting collage element as is, but you can paint it. I rubbed it with several colors of
DecoArt Metallic Lustre, then buffed it to a shine. I absolutely love this stuff!

Here’s how to make the other heart:

- Draw a heart-shaped design on a piece of Gelli-printed cardstock using red metallic
dimensional paint. - Let it dry completely, then trim along the edge of the heart design.
- Rub a little gold DecoArt Metallic Lustre along the very top of the dimensional paint design—
and buff with a paper towel to make it shine.

To complete the collage:
- Stitch one tiny X on each heart with red embroidery floss.
- Adhere the hearts to the collage. I used double sticky foam to add more dimension.
- Arrange the red thread (6-strand floss) in a meandering design, connecting the two hearts—
and glue in place.


Have fun making heart-inspired collages and Valentine’s Day art!
Remember, we now have Gelli partners all over the world so it‘s easier than ever to find a Gelli retailer near you!
Happy Printing!
WOOHOO well done that's fantastic. Love the canvas I never throw my bits away they go onto my mixed media pieces. Anita Itsamistry Design Studio.
Sensational hearts and the DecoArt Lustres are amazing, a must try project 🙂 xxx
Great project, and yet another use for those Gelli print bits I keep creating!
Congrats on second place and thanks for sharing this tutorial – looks great!
Huge congratulations and what a wonderful creation. Great step by step too. The hearts are stunning. TFS and best wishes
Annie x
CONGRATS on your win on 2nd place in the "Tool of the Year" category at CreativeWorld!!! Thank you for the great tutorial…looking to see if I can find a Gelli plate in my area.
My Gelli Plate arrived today! I can't wait to try out this collage project with all the prints I'll be making this weekend. So much fun!
Congratulations! Great project; thanks for sharing the tutorial.
Wonderful project. Thanks for the info.
Loving the hearts, going to make my Valentine card hearts like this, thanks for the inspiration.
Congrats!!!!
No surprise on the win Joan as it's an amazing art tool.
A really beautiful collage too and a great way to use up those treasured offcuts.
Fliss x
Me encanta el tutorial, me estoy aficionando mucho a esta técnica, pero no encuentro los materiales adecuados, como la gelli plate. Si sois tan amables de informarme. Vivo en España. Muchas gracias.
Nice post
Dhow Cruise Dinner in Dubai
Nice post
Cruise Dinner in Dubai Marina
Nice post
Movers In Dubai
So impressive!!! And gorgeous!!!
Nice post
Movers In Dubai
Nice post
Dhow Cruise Dinner in Dubai
Nice post
windows 10 wallpaper free download
Congrats on the award and thanks for the great tutorial!
I love using string in my projects. I have always used glue or decoupage medium in the past however, this is the first time I have seen someone use fabric stiffener on cord. Can you tell me what different results to expect with fabric stffener vs glue or decopage medium? Also, how do I make a mirror image on a HP inkjet printer? I can't find any selections in the options for mirror image. And my last question is when applying the mirror image, how did you get it exactly on the strips of paper where you wanted it without being able to see the printing face down on the opposite side? I would imagine it is extremely difficult to iron on top of it not knowing if it has moved and whether your iron will damage any surface (medium/varnish) on the edge of the paper. Do you put a cover parchment on top to protect the iron ? Sorry for all the questions! Want to make sure it comes out as beautiful as yours!
Congrats on your award. Sooo deserved!!
All I can say is that the Gelli Plate is actually MY "First Place" winner for "my" tool of the year!!! Don't know how I ever did without it!! 🙂
Nice post
Dubai City Tour