
Such cool effects can be achieved
in gel printing using a simple piece of folded paper. Watch this video to
see the interesting mark-making possibilities with accordion folded paper!
Simple accordion folds in a piece
of paper transforms it into a texture tool capable of making a variety of marks
for creating exciting prints!

After folding and experimenting
with different papers, I find index cards make the best accordion folded
texture tools. An ordinary 5” x 8″ index card works perfectly.
The folds shown here are 1/2″
inch intervals — creating a nice sturdy tool that holds up to the paint for
many usages. While you’re at it — make a few! Score and fold cards in both the
horizontal and vertical (or portrait and landscape) orientations.

Making accordion folds is so easy
using a Fiskars quilting ruler and a bone folder. Score lines at every 1/2 inch
—then fold the card into an accordion on the scored lines. Gather up the folds
on one end to form a fan shape and wind a bit of tape around the end to hold
the fan shape in place.
There are other ways to make
accordion folds — where a ruler and bone folder aren’t essential — so use the
method you’re familiar with. This paper texture tool needs the mountains and
valleys of an accordion, but exact folding precision is not required.

If you have a paper scoring tool,
such as theMartha Stewart Mini Scoring Board— making accordion folded papers
for Gelli® plate printing is another great opportunity to use it!

Experiment with folding papers and
see what you come up with for creating textures and marks in your Gelli®
prints!
In the video you’ll see how to
make a small rosette. I hold it together with Aleene’s Fast Grab Tacky Glue.
But many people prefer using hot glue for making paper rosettes, so use the
adhesive you prefer.


The printing paper used in the
video is Staples Card Stock 110 lb. that has been cut in half (to 8.5″ x
5.5″) for printing bleed prints on an 8″x10″ Gelli® plate. My
Fiskars SureCut Paper Trimmer makes that job super easy.

For printing, apply two or more
colors of paint on your Gelli® plate and roll it out with a brayer.
Press your accordion folded
texture tool into the wet paint and use it like a stamp. Pick it up and press
over and over in different areas. Make various marks by pressing the accordion
in wet paint and gently twisting or dragging it to move the paint. And rolling
the accordion edge into the paint creates a thin zigzag line!

When you’re happy with the image,
cover the plate with a piece of paper, rub to transfer the paint — and pull
your print.


Like many prints, a lot of these
are good beginnings. So keep working on them in layers to build your images.


TIP: When creating
bleed prints (no borders) — where the paper is smaller than the painted plate —
place a cover sheet over the printing paper to keep your hands clean. You can
use your cover sheets over and over. Deli paper is an excellent cover sheet, as
shown in the video.

Quickly pull a ghost print if
there’s enough wet paint on the plate.
If the paint on the plate is too
dry, but you like what’s there — allow it to dry completely. Then roll out
another layer of a contrasting paint color on the plate. To print this image —
give the paper some extra time on the plate. When you pull the print, it should
pull up all of the paint on the plate.


It’s amazing how addictive a
simple paper texture tool is to work with! You’ll have a stack of prints in no
time! And they’re great for collage — or working back into with your favorite
pens and pencils. So much fun!!

TIP: The paint used
in the video is Blick Matte Acrylic, which dries to a velvety matte surface
that’s friendly to colored pencils, pens, and other embellishments.


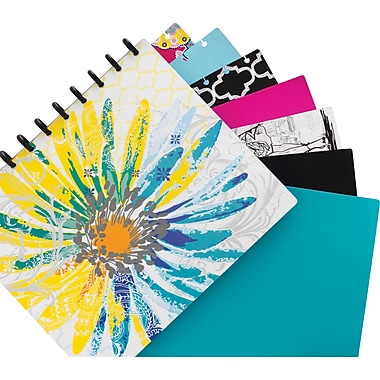
A great way to
keep the pages together is to punch them with an Arc Punch and bind them
together with Arc discs. Voila! A fabulous art journal! What I love most is
that I can pull pages out to work on them further, add more papers to the book,
and rearrange the pages at any time. Hard not to love the flexibility of disc
bindings!

THIS GIVEAWAY IS NOW CLOSED!!!!
our winner is Lorelea!!
We have a special GIVEAWAY for making
gel printing pages you can embellish and bind!!

One lucky winner’s prize kit will include:
- 1 –8″x10″ Gelli Arts® Gel Printing Plate
- 1 –Staples® Arc System Desktop Punch
- 2 –Sets of Staples® Arc System Notebook Expansion Discs
- 2 –Sharpie Extra-Fine Point Waterbased Paint Marker Sets (Pastels, Metallics)
To enter the giveaway, click on the red “ENTER GIVEAWAY
HERE” button below! (This will ensure that we can contact the winner and
that entries are limited to one per person. One winner will be selected
from all the entries via a random number generator to receive this very
special giveaway!) Entries will be accepted until Tuesday March 1st at noon EST. Our lucky winner will be contacted by email and announced
here on the blog and on our Facebook page no later than Tuesday March 1st at 5pm EST!
THIS GIVEAWAY IS NOW CLOSED!!!!
Please—share your prints with us on our
Facebook page, or on Instagram using the hashtag #gelliprint #gelliarts or #gelliplate. Tag us with
@gelliarts on Instagram and Twitter too! We love to see what you’re creating!!
Remember, we now
have Gelli® partners all over the world, so it’s easier than ever to find a Gelli® retailer near you!

Good
Luck and Happy Printing!
Products used in this tutorial!
|
|
|
|


|
|
|


|
|
|
|


What a fun and unique way to add texture!! Love this and can't wait to try it!
Thanks Julie! Please try and let us know how it goes!
'Works like a charm! Love love love it! Thank you!
This is awesome! I really need to play with my gelli plate. It's been sooooo neglected.
Forgot to add the bottle cap for a handle is genius!
Great to hear Melody! Glad you like the handle idea 🙂
Whoa! Very cool! I need to try this with my Gelli plate. Thanks for the inspiration!
Sounds like fun. fun, fun! LOVE the look the accordion fold gives to the prints!! Definitely time to get them out and get busy! Thanks for the inospiration!1
This looks like so much fun! I cannot believe that you've come up with yet another innovative thing to try!
Just when I think all the possibilities w a Geli Plate have been exhausted, there is a new, fabulous one! Thank you!
Brilliant ideas! Can't wait to try this technique!
Oh my word, how do you come up with such brilliant ideas?!!! Once again I am inspired to hit the gelli plate with this cool technique. I might just have to stay home from work, I am that excited!!! Okay, work first then fun!!!!! :0)
OMG I just fell in love with my Gelliplate over again!!!!!!!!
Nice! I love it.
How gorgeous.
I just made some Gelli prints after watching your video… This is my favorite technique, I loved how all the prints turned out!! I would attach photos but not sure how to do it…
Hi Jeanne – Are you on FB or Instagram? If so, please post the pics to our FB page – http://www.facebook.com/gelliarts or post to instagram and tag us with @gelliarts 🙂 We would love to see them and if we can, we will share!
gorgeous effects! very inspirational.
great ideas! Thanks.
WOW! Once again I am blown away with the techniques you come up with for the Gelli plate! I especially love the prints the rosette makes – just gorgeous. Thanks!!
Such great tips, and wonderful results!!! A generous giveaway, so I hope the gods are smiling on me for this one. Many thanks.
VERY Cool!!!
Great technique!
Gelli Plate Printing: Mixed-Media Monoprinting Without A Press? Sounds like FUN! Love the round medallion technique.THank you for the chance to wIn!
I think this is my favorite technique so far! The prints remind me of fabrics I sewed in the late 80's or so.
I think this is my favorite technique so far! The prints remind me of fabrics I sewed in the late 80's or so.
This comment has been removed by the author.
How gorgeous this is!
Hugs Yvonne
Inspired!
Love this idea thank you:)
Great idea! Love it and thanks for a chance to win!
This is fantastic! I can't wait to try this out. EEeeeeeek!
Wow! What an absolutely amazing and creative idea which I can't wait to try either!
Thanks so much for sharing and all the samples look just fabulous!
Really great giveaway too!
Fliss x
Wow! What an awesome technique.
Fantastic video, you never cease to amaze and inspire 🙂
I know what I will be doing tomorrow, fantastic technique, can't wait to try it! x
what a very cool idea-and I love the little book! So addicted to my one gelli plate and would love to add to it. Thanks for the giveaway offer!
Love it!
Great post, such amazed me to follow lot things, keep it continue.
ink jet paper
laminating pouches
pouch laminators
creasing machine mcr46
creasing machine mcr35
the appearance of sores that slowly heal, having dry and itchy skin, loss of feeling or tingling in feet, and blurry eyesight. vedda blood sugar remedy
So beautiful craft! diy project