
The planner bandwagon has been circling for quite some time — and
I’m finally ready to jump on! It’s past time to put some effort into organizing
my calendar, to-do lists, project ideas, and so on. Where to start? There’s a
world of planners out there! My number one priority: I want lots of my pages to
be Gelli® prints 🙂

It’s the ultimate mash-up! A customized planner filled with gel printed pages! A hybrid planner/art journal. The best of
both worlds. That’s how I envision it.

I also want to be able to rearrange the pages and add more as I
go — including different types and weights of papers, in a
variety of sizes. A totally flexible approach. To be able to take a page out,
work on it further, then put it back — in a book that opens totally flat!

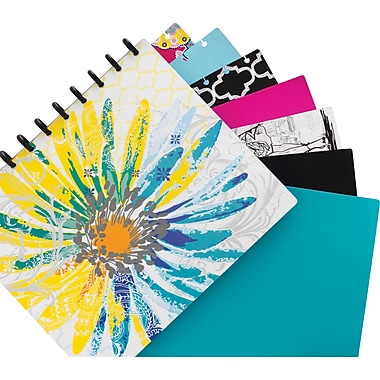
Good news! I found the perfect system at my local Staples — ‘M by Staples’ Arc System Project Planner…customizable notebooks.

The Arc system’s binding is made of individual plastic disks
that fit into specially punched pages. The pages lift out and press back in — so
you can easily add or rearrange pages. Different types of covers (in several
sizes) are available. There’s even a clear cover so you can showcase your Gelli® print as the cover art! Larger disks can be purchased to accommodate more
pages, and smaller disks for fewer pages. It comes with lined pages, but
different types of pages and accessories are available. You can truly design
your own system.

What I like best is that you can buy the punch — making
it possible to convert any paper into an Arc compatible one. It’s not
inexpensive, but it’s well worth the cost if you want to customize your planner
and include your own printed papers.

There’s a smaller, light-weight punch — available at a
lower cost — that’s mobile and easy to pack.

If you want more info, check out the Arc system at Staples.
I’m here to show you how cool it is to use with Gelli® prints!!

If you print on copy paper or card stock (8.5″ X11″),
you’ll find that cutting the print down the center will give you two pages
(8.5″x5.5″) — perfectly sized for the Arc planner!
And if your original print was created on an 8″x10″ Gelli® plate, you
probably have blank margins on three sides of each cut page.

The blank margin space creates a great opportunity to embellish
the pages. Washi tape, rubber stamps, collaged ephemera, doodling, and painting
are all potential ways to take advantage of this space.

Or create Gelli® prints intentionally for use in your planner — and
if desired you can eliminate the margins when you print. Print overlapping
layers to cover the entire paper. And of course, you can always cut down a
print so that you get one planner page from a piece of copy paper. Let your
printed image tell you how to use it.

Most of my prints are created on one side of the paper, leaving
the back blank. That means I can use the other side for any purpose, such as
calendar/diary entries, journaling, favorite quotes, collage and drawings. I
also use these pages as a sketchbook to capture ideas and inspiration for new
pieces of art.

Another option is to create a Gelli® print on the back side.
Easily done! If a one-sided print is already in your book, simply pull it out,
print on the back and reinsert it into the planner. Being able to take pages in
and out is an extremely convenient feature!

I’m crazy for this system! So now I’m going through my stash of
prints looking for pieces to ‘Arc’. Sometimes a section of a print is all I
want to capture and save in my book. Not a problem! Just trim the print, then
punch it and stick it in. Or glue it to the back of a page. Another option is
to create pockets on prints to slip papers into. More fun!!!

There’s an obsessive, addictive aspect to working in this type
of planner. It’s an ideal ‘catch-all’ for scraps of paper, bits of ephemera,
photos — and endless opportunities for incorporating washi tape,
rubber stamping, stickers, doodling, and drawing on your Gelli® pages!

Here’s another fun thing I’ve discovered: flippingthrough assorted gel printed pages
serves as a great reminder of the various techniques that were used to create
them. Recalling a technique you want to explore further is a perfect way to
jump-start your next printing session! There’s much inspiration to be found
among a compilation of prints. I can’t wait to do more “thick & thin” prints, and “painterly layers“! With so many different
Gelli® techniques to work with, it’s easy to lose track of some of them — and
GREAT to revisit them!


Now, off to schedule some Gelli Arts® printing time on my calendar! I
need more pages!!!

Are you using a planner? If you do, are your Gelli® prints in it?
We’d love to hear if you’re into planners, so please leave a comment and tell
us about it!
Have Fun and Happy
Printing!
Materials Used in Today’s Blog:
|
|
|
|


|
|
|
|


|
|
|
|


|
|


Hello very nice.gr.Nel
Thanks @crealinedance!
WOW stunning work!
Thanks Julie – glad you like it!
This makes me want to run immediately to Staples!!!!! I already have every size of Gelli plate, just have to find a way to get enough extra time to use them all.
That planner is so cool. I'm going to have to check it out!
I found a Project Life planner/notebook in the clearance section of Michaels but I could easily fill it with more of my own art work. Thanks so much for the great idea!
Omg, I love this! I'm actually teaching a gelli printing class today, in CT. And now I want to turn it into a planner making class! Inspiring post! Xo
Last weekend our group planned a Gelli Art weekend, but it was cancelled due to the SC floods. After dealing with the rain, floods, and recovery process, we all need some relaxing time together. This project will make a great "let's get together" day.
I am trying to get the supplies ready for our day. I will use my notebook for journaling. I know many friends will want to use it for a calendar. I am having a problem finding the 2016 planner pages for either size Arc notebook. I notice your calendar in the last photo. Are all the Arc planners undated calendar replacements?
Thanks for your assistance and for a GREAT idea to use our Gelli prints.
Very beautiful. There are so many things to do in planners.
I'm already and "Arc Planner" user but never thought of putting gelli prints in it. It is such a great idea. Thanks so much for sharing this. Now it's time to make some pages for my planner and maybe some for my daughter's planner too. Thanks again…Linda E.
Again an awesome possibility what to do with all these Gelli paper that piles up. Thanks for that idea. Petra
The more I see the amazing stuff Gelli plate can do, the more I want it, but can't have it.
My Arc punch has been sitting unused for quite a while – this is such an exciting idea!
That's so funny I was just eyeing up my Zutter that was gathering dust on the shelf. I love how you have mixed a real planner and Gelli Prints though it looks so neat. Some lovely prints too. xx
This is an awesome idea!!!! No, I don't currently use a planner but this could change my mind 🙂
What a great idea! I am always looking for ways to display my prints, and this is certainly a perfect fit! Thank you!
Very nice post, impressive. its quite different from other posts. Thanks for sharing.
anti skid tapes supplier in india
Very nice post, impressive. its quite different from other posts. Thanks for sharing.
anti skid tapes supplier in india
Love this idea!